
Test Post: Steps About Plastic Mold Process Setting
We all know that improper mold tool design often causes defects in the final product. Before modifying the mold, try out the mold and evaluate it, optimize the mold tool design and process parameters, which can usually achieve a multiplier effect with half the effort, while meeting the high-quality requirements of mass production for custom plastic parts and rubber parts.
Benefits of Plastic Mold Testing
The plastic mold test is not a procedural step but a strategic in manufacturing success.
First, mold trials guarantee part quality by verifying dimensional accuracy, surface finish, and functional performance against specifications. A well-executed trial mold process catches discrepancies early, preventing defective parts from reaching the market.
Second, identifying issues during the mold trial phase, eliminates the need for costly rework during production.
Third, mold trials optimize the injection molding process. By fine-tuning parameters like injection pressure, temperature, and cooling time, manufacturers achieve shorter cycle times and higher efficiency. Regular mold validation also contributes to extending the injection mold lifespan, reducing long-term costs.
Finally, providing trial samples allows clients to review and approve parts, ensuring alignment with expectations. This collaborative approach, facilitated by trial mold results, builds trust and streamlines project timelines.
The Eight Basic Steps of a Plastic Mold Test
To ensure completeness and consistency, the Plastic Mold test usually follows this systematic 8-step workflow:
Step 1. Material and Process Preparation
Study material properties (e.g., drying requirements, flow characteristics) and define trial parameters (e.g., injection pressure, temperature). Ensure compatibility with the mold and machine.
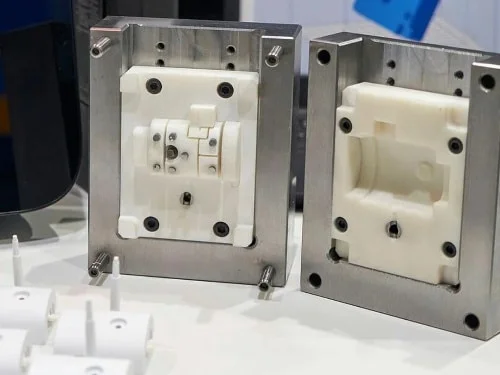
Step 2. Mold Inspection
Before installation, the mold undergoes a rigorous inspection, include mold appearance, materials, gating system, cooling channels, and ejection mechanisms.
Step 3. Equipment Setup
Selecting the appropriate injection molding machine based on factors like mold size, shot weight, and material requirements. The machine’s nozzle radius, barrel cleanliness, and auxiliary equipment (e.g., chillers, temperature controllers) are verified to support the plastic mold test.
Setp 4. Mold Installation
The mold is mounted on the machine, precise alignment cooling and ejection systems. Initial tests in manual mode confirm mold actions, such as ejection and reset, function smoothly.
Step 5. Trial Run Execution
The plastic mold test begins with initial injection cycles, producing a small batch (10-20 parts) to evaluate material flow, cooling efficiency, and ejection performance.
Step 6. Part and Assembly Inspection
Measured the produced parts for dimensional accuracy, weight, and surface quality. Assembly fit with other components is tested to identify issues like misalignment or poor tolerances.
Step 7. Process Optimization
Based on trial results, parameters like injection speed, holding pressure, and cooling time are adjusted to eliminate defects.
Step 8. Final Approval and Documentation
The mold is run for 1-2 hours to verify stability under production conditions. Results, including wear-prone areas and maintenance needs, are documented.